Typst 模式
Typst 模式目前还是一个实验性功能,欢迎广大 Typst 用户提供反馈。
Typst 模式允许您将原来 LaTeX 公式块中的内容替换成您喜爱的 Typst 公式,或直接渲染 Typst 的代码块。只要可以在 Typst 中通过编译的有效代码,插件都可以正常上传到知乎。
但是 Zhihu on Obsidian 只负责上传到知乎,并不负责 Typst 的渲染。所以为了保证您的编辑体验,推荐安装 Typsidian 或者 Wypst,这两个插件可以将 Typst 公式块实时渲染。
设置 Typst 路径
在开始之前,您必须设置 Typst 可执行文件的路径。您可以在 Typst 官方 GitHub 仓库 中选择适合您的系统的可执行文件,然后下载到本地并解压。然后将路径添加到设置中:
点击左边的刷新按钮,如果有提示:Typst 版本:xxx,并且左边正确显示了 Typst 的版本,则表明 Typst 路径设置成功。如果左边仍然显示 Typst 版本:未找到,则说明路径设置不正确。
Typst 行间公式
Typst 功能可以使您上传 Typst 行内公式到知乎。所以仅需用正常的 markdown 语法包裹 Typst 公式,就可以正确发表到知乎。需要注意行间公式使用$$包裹,而不是使用$+空格
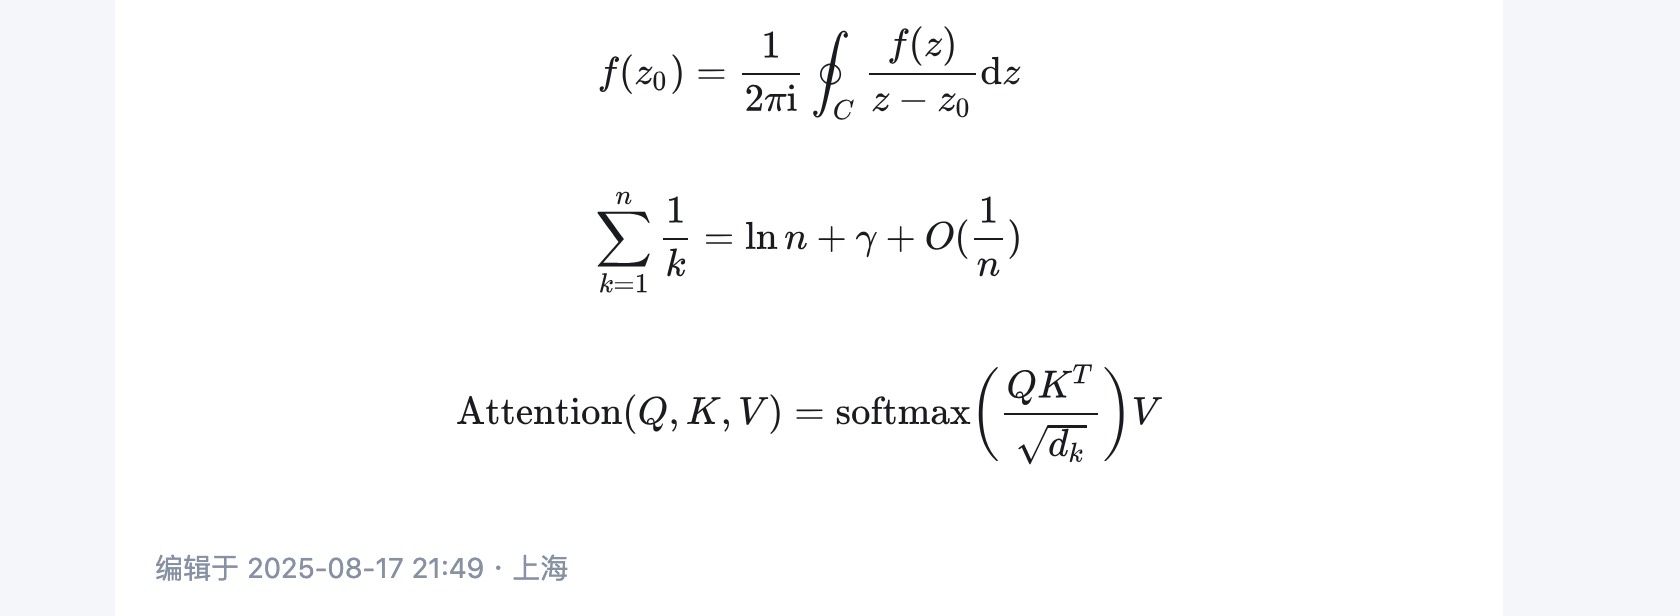
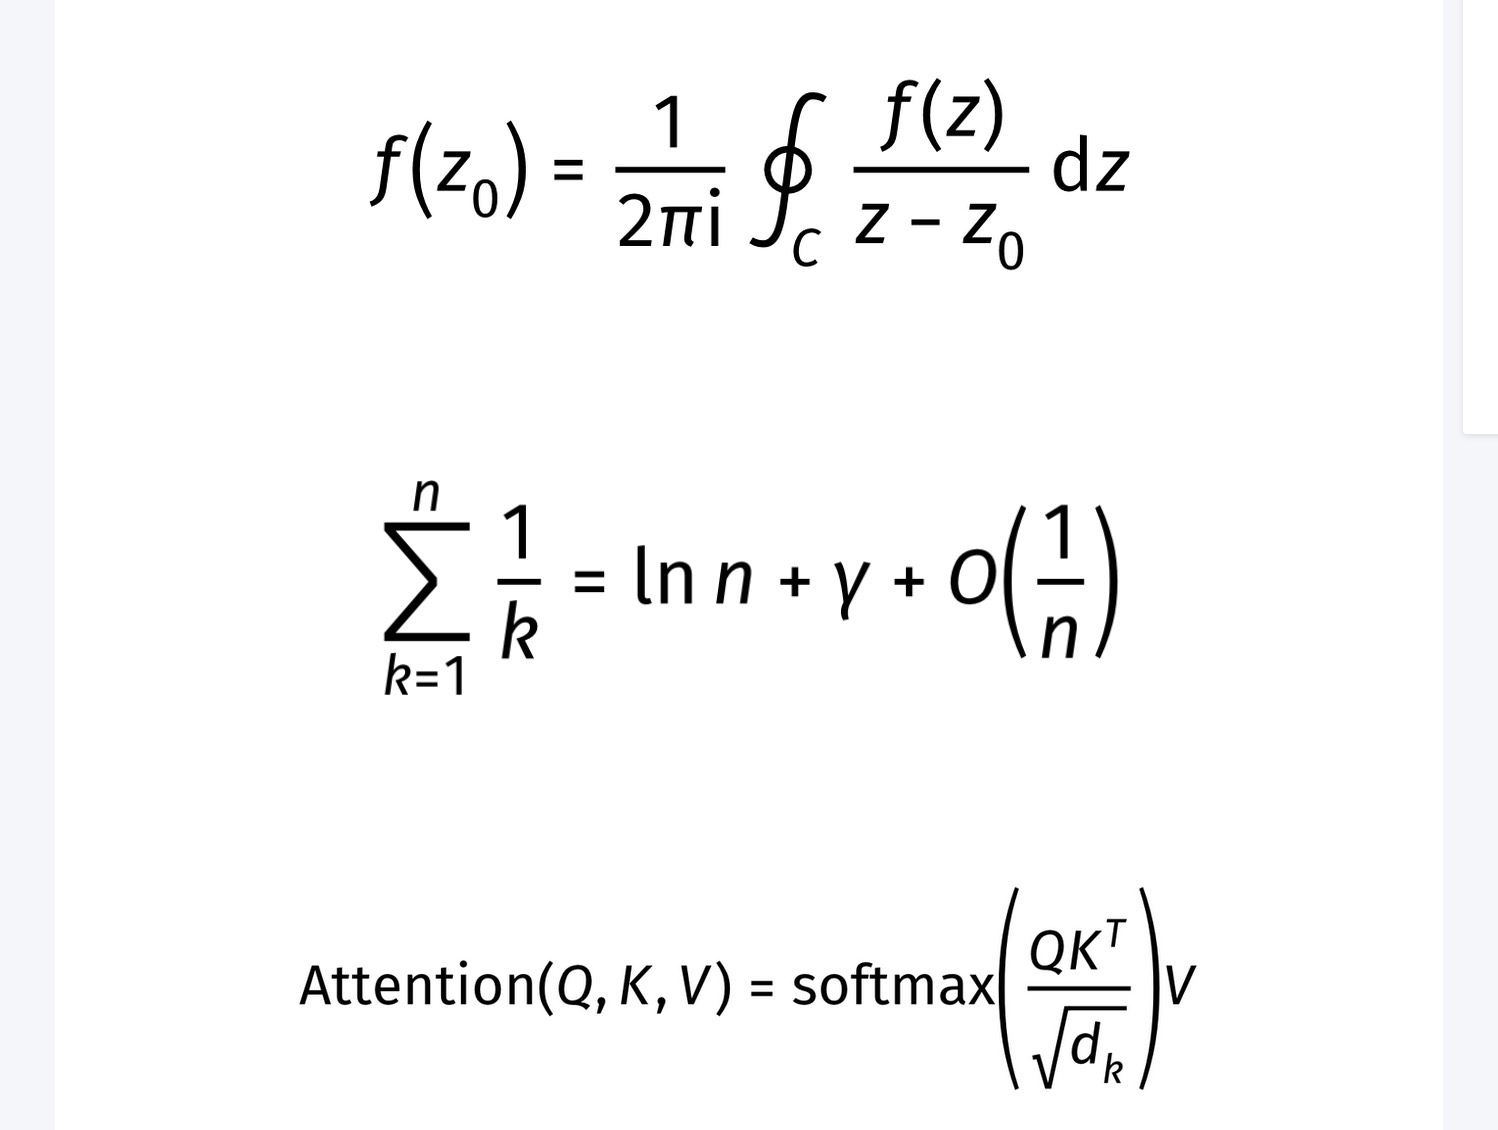
例如:
$$
f(z_0) = 1/(2 pi upright(i)) integral.cont_C f(z)/(z - z_0) dif z
$$
$$
sum_(k = 1)^n 1/k = ln n + gamma + O(1/n)
$$
$$
op("Attention")(Q, K, V) = op("softmax")((Q K^T)/sqrt(d_k)) V
$$
示例的渲染结果:
行间公式的渲染有两种方式可供选择:
-
转换成 LaTeX 公式:使用 tex2typst 将 Typst 公式转换成 LaTeX 公式。这样的好处是公式更加原生,在知乎网页端和手机端都有很好的渲染效果,在公式并不复杂的情况下推荐。缺点是 Typst 并不一定可以原封不动地转换成 LaTeX,一些 Typst 独有的符号或者语法并不能很好地转换。
-
转换成图片:使用 Typst 命令行 将 Typst 转换成白底黑字图片。这样渲染的优点是对 Typst 公式有原生支持,只要编译通过的 Typst 均可以正常显示。缺点是在网页端和移动端行间公式以图片的形式显示,在暗色模式的知乎下并不如原生 LaTeX 美观。
Typst 行内公式
由于知乎不能插入行内图片,所以 Typst 行内公式只能转换成 LaTeX 渲染。例如:
Let $f:[a,b] to bb(R)$ be Riemann integrable.
Let $F:[a,b] to bb(R)$ be $F(x)= int_a^x f(t) dif t$.
Then $F$ is continuous, and at all $x$ such that $f$ is continuous at $x$,
$F$ is differentiable at $x$ with $F'(x)=f(x)$.
渲染结果:

Typst 代码块
您还可以将 Typst 代码放入一个特定的代码块中,插件会识别改代码块,调用 Typst 命令行并转换成图片。默认的代码块是typrender(您可以在设置中自定义想要的代码块语言)。
您可以在代码块中插入任意合法的 Typst 代码,甚至导入 Typst 包和模板。例如下面是一个用 CeTZ 包演示斯涅耳定律的例子:
```typrender
#import "@preview/cetz:0.3.0"
#figure(
  cetz.canvas({
  import cetz.draw: *
  let x = 4
  let a = 3
  grid((0, -a), (x + 1, a), step: 0.5, stroke: gray + 0.2pt)
  anchor("X", (x/2, 0))
  content("X", [$bold(x)$], anchor: "north", padding: .1)
  anchor("A", (0, a))
  content("A", [$A$], anchor: "east", padding: .1)
  anchor("B", (x + 1, -a))
  content("B", [$B$], anchor: "west", padding: .1)
  anchor("O", (0, 0))
  content("O", [$O$], anchor: "east", padding: .1)
  anchor("P", (x, 0.2))
  content("P", [$P$], anchor: "west", padding: .1)
  anchor("beta", (x, -1.5))
  content("beta", [$text(#orange, beta)$], anchor: "west", padding: .1)
  anchor("l1", (x/2, a/2))
  content("l1", [$l_1$], anchor: "south", padding: .2)
  content("l1", text(blue)[$ v_1 $], anchor: "north", padding: .2)
  anchor("l2", (x+1/2, -a/2))
  content("l2", [$l_2$], anchor: "west", padding: .2)
  content("l2", text(blue)[$ v_2 $], anchor: "north", padding: .6)
  anchor("equation", (x + 3, a - 2))
  content("equation", text(black)[Snell's law], anchor: "south", padding: .1)
  content("equation", $ text(#orange, sin alpha) /text(#blue, v_1) = text(#orange, sin beta) /text(#blue, v_2) $, anchor: "north", padding: .1)
  line((0, 0), (x + 1, 0), mark: (end: ">")) // x
  content((), $ x $, anchor: "west", padding: .1)
  line((0, -a), (0, a + 1), mark: (end: ">")) // y
  content((), $ y $, anchor: "south", padding: .1)
  line((0, a), (x, 0), stroke: red + 1.2pt, name: "l1", mark: (end: "straight")) // l1
  line((x, 0), (x + 1, -a), stroke: red + 1.2pt, name: "l2", mark: (end: "straight")) // l2
  line((x, a), (x, -a), name: "dotline",stroke: (dash: "dashed"))
  cetz.angle.angle("l1.end", "l1.start", "dotline.start", label: $ text(#orange, alpha) $, radius: 1)
  cetz.angle.angle("l2.start", "l2.end", "dotline.end", radius: 1)
}),
caption: [斯涅尔定律]
)
```
渲染结果:
Typst 预设样式
您可以在设置中修改 Typst 的预设样式。在默认设置中,预设样式是:
#set page(width: auto, height: auto, margin:(x: 40pt, y: 10pt))
它的意思是:将页面大小设置为适应公式,并且将左边距设置成 40pt,右边距设置成 10pt。它可以让公式在知乎上更好的显示。否则,如果删掉这个样式,那么每个公式都会是一张A4纸大小,即 Typst 默认纸张大小,这一般不是我们想要的。
此外,您还可以在这里做一些自定义改进,例如设置字体:
#show math.equation: set text(font: "Fira Math")
使用前请确保您的电脑上安装了 Fira Math 字体,否则会报错“字体未找到”,渲染将回退到转换成 LaTeX 模式。
下面是渲染效果:
例如自定义函数:
#let scr(it) = text(
  features: ("ss01",),
  box($cal(it)$),
)
markdown 代码:
$$
cal(P) != scr(P)
$$
显示效果:
